GMS Collaboration Plugin for Outlook.
This plugin allows you to share email data such as folders, contacts, calendars, tasks and notes with other Outlook users and view data that users wish to share with you.
Once the plugin is installed, you will find an additional tab marked ‘GMS’ at the top of your Outlook inbox:
![]()
Underneath this tab you will find a number of buttons that will allow you to manage what you share, and with whom, as well as what they share with you. You can also synchronize your data with the GMS Collaboration plugin.
Sharing:
The first set of buttons you will see in GMS Collaboration allow you to manage what folders you share with other accounts and provide the means by which you can access the folders that others share with you.
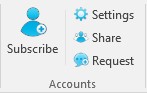

The first button you will see in this section is the Subscribe button. Clicking this button will launch a window where you can view the accounts that are sharing with you and the folders that each of those accounts is allowing you to access.
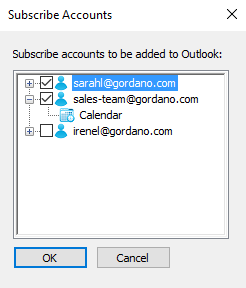
The tick boxes to the left of each account allow you to select whether you would like to access the information the account is sharing. You can view each of the folders they are sharing by using the box marked with the + symbol by each account name. Click OK to apply your changes.
Once you have done this, you will find the shared items from these accounts in the left-hand panel within your Outlook:

If there are no accounts currently sharing with you, clicking the Subscribe button will open a window alerting you to this fact. You can rectify this by clicking the Request button.
![]()
Clicking this button will launch a new window which will allow you to request specific folders from specific users.

In order to successfully request a file:
- Select folder from the Folder List dropdown
- Click the Add button to get the Add Account dialog
- Select the specific account you would like to request from, then click Add and then OK
- Select your desired permission level by clicking in the tick boxes to the left of the various permissions
- Click Apply to save your changes
- Click Send to complete the process; an email request will then be sent to the specified account
To manage your own sharing options and share your own folders with other accounts, use the Share button:
![]()
Clicking this button will launch the Share dialog window:

In order to successfully share a folder with another account:
- Select folder from the Folder List dropdown
- Click the Add button to get the Add Account dialog
- Select the specific account you would like to share with, then click Add and then OK
- Select the permissions you would to grant this account by clicking in the tick boxes to the left of the various permissions
- Click Apply to save your changes
- Click OK to complete the process; an email will be sent to the specified user alerting them that you have shared a folder with them, with instructions for them to follow in order to view the shared item
![]()
Clicking the Settings button will launch a dialog window allowing you to manage your GMS settings. From here you can manage both general settings:

And advanced settings:

Synchronization:
Synchronizing your data is important, in order to ensure that what you are sharing with other users is always up to date. Your data will automatically be synchronized after the installation of the plugin, and you can set up automatic synchronization to happen at specific intervals throughout the day. You can also use the buttons in the middle section of GMS Collaboration to manually control this synchronization.

![]()
Selecting the ‘Email’ button will synchronize all of your email folders. A window will open displaying what is synchronizing. This will close once the sync has been completed.


The Collaboration button with synchronize most of your other data, including calendars, tasks, and notes. Collaboration also includes Contacts and Journals. These are contacts that you create in Outlook. As with the email button, selecting this option will launch a popup window that will close upon the completion of the sync.

The Address Book button equally serves the same purpose – clicking this button will synchronize your contacts.
![]()
The Sync All button will sync all of your data at once – emails, folders, contacts, calendars, etc.
All of this data will automatically synchronize with GMS Collaboration periodically throughout the day, at regular intervals. To manage this further:

- Select File in Outlook
- Then select Options
- In Options, select Add-Ins
- Select GMS Outlook Addin amongst the list of your add-ins.
- Click the Add-in Options button, which will launch the window where you can manage the synchronization settings:

Misc.
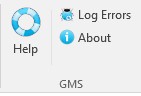
The buttons to the furthest right within GMS Collaboration provide additional information that may be useful to you:
![]()
Selecting the Log Errors button it will provide the option of managing how you log certain problems with GMS Collaboration, simply by:
- Selecting the tick box to the left of the option you would like to log
- Click OK
- Click Apply

You can also open the Log Folder from this view.
In case you run into any problems, the support would like to see the log to find what has caused your plugin to fail. In this case, the support will ask you to check these boxes, and send the log file whenever you run into any problems. Logging takes some processing overhead, so only use this option when required.
![]()
The About button will simply tell you what version of GMS Collaboration you are currently running:
