DKIM allows you to sign outgoing messages sent by your GMS server. Using this can help in making email delivery more reliable to public cloud services such as gmail or Outlook.com
DKIM support was added in version 20 of GMS – if you want to enable DKIM you will need to upgrade your installation to this version, available from the Downloads page
DKIM uses a combination of public/private key signing, and a DNS record to allow recipient systems to validate your emails as being sent by your GMS server.  As such in addition to making changes in the GMS admin interface, you will also need to add a DNS record to your domain.
First, you must go to the administration interface, and to the Domains and Users menu in the left panel – here you should select your domain you wish to configure for DKIM. Next select the DKIM tab.
On the DKIM tab, first you will configure the required values. You should not need to change most of the default values.
Selector
This is the DNS value that is associated with your public key.
The most important thing is: selector indicates your DKIM public key location.
For example:
- If your domain selector is: mail, your public key record should be
mail._domainkey.yourdomain
- If your domain selector is: key1, your public key record should be
key1._domainkey.yourdomain
Next, you must enter a passphrase to protect your key, this can be anything you choose.
Press the “Create New Key” button to create a DKIM public key for your domain, based on your private key and settings in this page.  This key then needs to be added to a DNS record for your domain.
Copy the value from the public key field, then press the update settings button. At this point you have not enabled DKIM signing, as the configuration is not complete.
Now you must create a DNS record for your domain.
An example configuration is here:
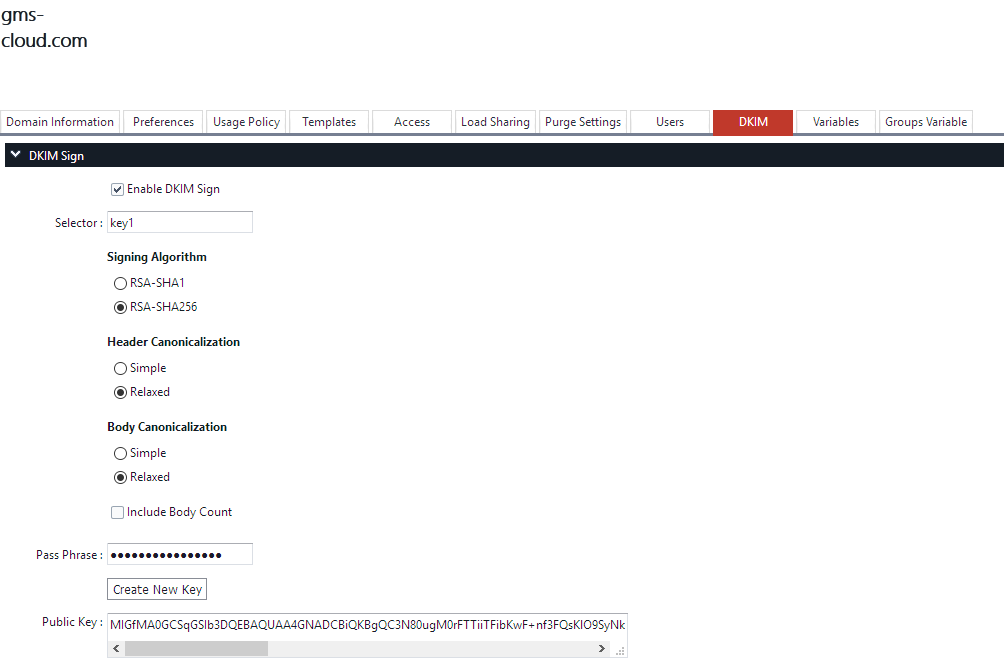
From this example, we take the public key value and configure a record of type “TXT” in DNS. The selector for this system has been configured as “key1” and the domain is “gms-cloud.com” so the DNS record must be edited for the gms-cloud.com domain name, and the entry will need to be configured as follows in this DNS zone:
key1._domainkey IN TXT ("v=DKIM1;t=y;p=MIGfMA0GCSqGSIb3DQEBAQUAA4GNADCBiQKBgQC3N80ugM0rFTTiiTFibKwF+nf3FQsKlO9SyNk19Q1iVwYi5VOWsJuYRUE7boPniyixHQb+8KGO8yQNeb7zGQHYLEPDfpgBw5hFRVXjTdT7QX2K7YkQFMwWhIKv0H38SGmsSYlf4QevsGaJYHqQp5kiiwfbtz3NGaMaHLxP0O2LjQIDAQAB")
Once you have created the DNS TXT record, you can use a service to check that the record is valid – such as this:
Enter your txt record name – e.g. key1._domainkey.gms-cloud.com – then set the lookup type to TXT and run the test. IF succesful you should see your DNS result from all servers.
Having done this, and confirmed that your DNS is correct, you can go back to the admin interface and enable the “Enable DKIM sign” checkbox, and press update settings again.
Finally as a test to confirm this is working, you should use a DKIM test tool.