GMS Project uses a series of pre-defined templates which can be completely customised according to the requirements of the user. To learn more about the the pre-defined project templates found in GMS Project, please read this article.
Before customising a pre-defined template, a template itself (which will form the basis of the custom template) must first be selected. A project template type can be picked by selecting ‘Templates’ from the menu tree on the left of the default GMS Project menu, as shown below:
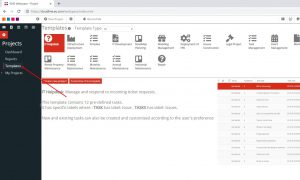
Once a pre-defined template has been selected, that template can now be customised by clicking on the ‘Customise this template’ button on the default GMS Project menu.
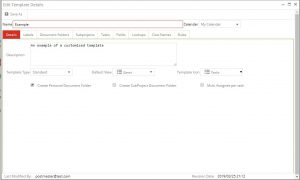
The criteria of the customisation can now be established using the fields in the ‘Edit Template Details’ popup menu. In this menu, the template can be customised as follows:
- Details – Template name and description, template type, view/appearance and icons can all be changed.
- Labels – Label containers are pre-defined per template and cannot be customised (other than the text labels within those containers). Labels are used to help organise content.
- Document folders – Add and remove specific document folders.
- Subprojects – Subjprojects pre-defined for the chosen template can be removed and new subprojects can be added.
- Tasks – Tasks pre-defined for the chosen template can be removed and new tasks can be added.
- Fields & Lookups – Tasks can be customised with different field types.
- Cost Names – Add, remove and define costs and their associations.
- Rules – Specific rules can be created and removed based on different variables and dependencies.
Please see an example below with all (required) fields completed:
Once the criteria of the customised template have been established it can be saved. This will contain the custom template within a folder called ‘User Templates’. The pre-defined templates will be contained in a folder called ‘System Templates’. The custom template can now be used to create a project. For information on how to create a project, please read this article.