Adding support for secure connections in GMS is important to help to increase the security of your data during transmission. Additionally it can assist with more reliable message delivery, and so it is a worthwhile modification to make to GMS.
This article describes in detail each step of the process of enabling and configuring GMS to support secure connections. In this article we will describe using a “self signed” certificate for the purpose of testing and setup. When complete you can then switch to a verified certificate provided by a certificate authority.
Please note: screen shots in this article are taken from Version 20 of GMS – your interface may differ in colour scheme and icon set, but the layout and locations will remain consistent. If you wish to benefit from the updated look and feel you should upgrade your GMS installation to version 20.
Step 1: License Key
We will provide you with a key to activate SSL free of charge. To see if you already have one, in the administration interface go to “licensing” in the left panel. If you have a license key, you will see this:

If you see the above, you can skip to step 2. Otherwise, please take a note of your customer reference number on this licensing page, and send an email with your customer reference number requesting an SSL key to sales@gordano.com
When you receive this license key, apply it on the licensing page and then move to step 2.
Step 2:Â Create a secure certificate for use by GMS.
To create a self signed certificate, GMS provides a utility called “keycert”. This will create a certificate and key pair, and apply them to GMS.
To run keycert, you then need to navigate to the \Gordano\Bin directory in windows explorer and then right click the program called ‘Keycert.exe’ and click ‘Run as administrator’ (Note: it is essential that you run as admin for the utility to work). When it opens, select ‘Generate a self-signed certificate for testing’ then change the number of days to 365 and click next.
On the next screen, set the key name as sslkey.pem and the cert name as sslcert.crt, then hit next and choose a common name. The common name should be the name of your email server, e.g. “mail.gordano.com”. You need to ensure that the ‘Use as default global certificate’ option is checked.
Now keep clicking next and enter in the information as requested for your organisation. The final step is entering a passphrase, as this is for testing just type something easy to remember. This then generates the sslkey.pem and sslcert.crt files in the Gordano\Bin directory. It will also generate the required entries in the registry to tell GMS to load these files at startup.
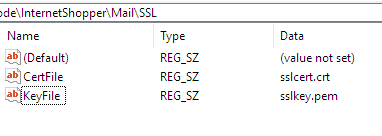
Step 3: confirming your files and registry entries exist
To confirm your files have been created, go to the Gordano\bin directory and locate the files sslkey.pem and sslcert.crt.
Next, open regedit32.exe on your server, and navigate to
HKEY_LOCAL_MACHINE\SOFTWARE\WOW6432Node\InternetShopper\Mail\SSL
In the right hand pane you should see your key and cert files referenced here:
If your files or registry entries are missing, you probably forgot to select “run as administrator” when running keycert, go back to Step 2 and repeat the process.
Step 4: checking secure ports
GMS will by defualt use the standard secure ports for email. You can confirm what these are from the System Administration->Performance->Ports page in the admin interface. Here you will see a list of the ports defined. You should additionally set an appropriate port for HTTPS access – so that you can test with a browser to confirm the certificate/key file are functioning correctly. In the example image below you can see this is set to 8443 for admin, and 443 for Webmail.
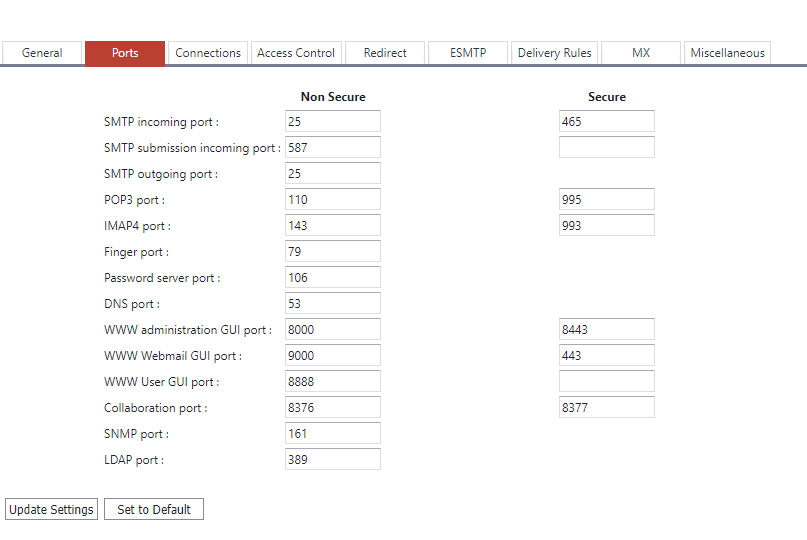
Make a note of these ports – if you use a firewall to protect your network you will want to permit access to those ports you require one testing is complete.
Step 5: restart services to load certifcate files and bind to secure ports
To trigger GMS to load the certifcate and key file, and to accept connections on secure ports, you should stop and start the services.
How to stop and start all the GMS services
Step 6: test using a browser
The GMS services will now have loaded the key and cert files, and should be accepting connections on the secure ports you defined. To confirm this is working as expected, open a web browser on the server and use the secure admin UI port you defined to connect to the administration interface. If you used port 8443 as per the example, you will need to enter https://localhost:8443
You will then see a secure connection is established, but you will be notified of certificate errors:
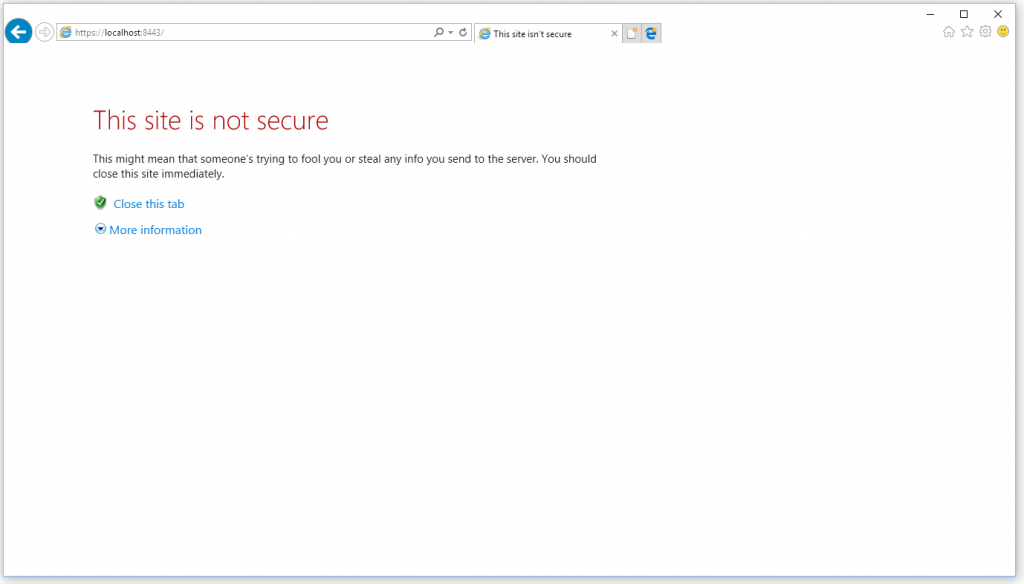
Do not worry – this is a good sign as it means the certificate is working. You are getting this warning because you used a self signed certificate so your browser cannot verify the identity of the certificate. Click the “more information” option (internet explorer) or the “advanced” option (Google Chrome) then click “go to the webpage” (IE) or “proceed to website” (chrome). Your admin interface should then load. This has confirmed that your GMS WWW service is correctly utilising the secure certificate.
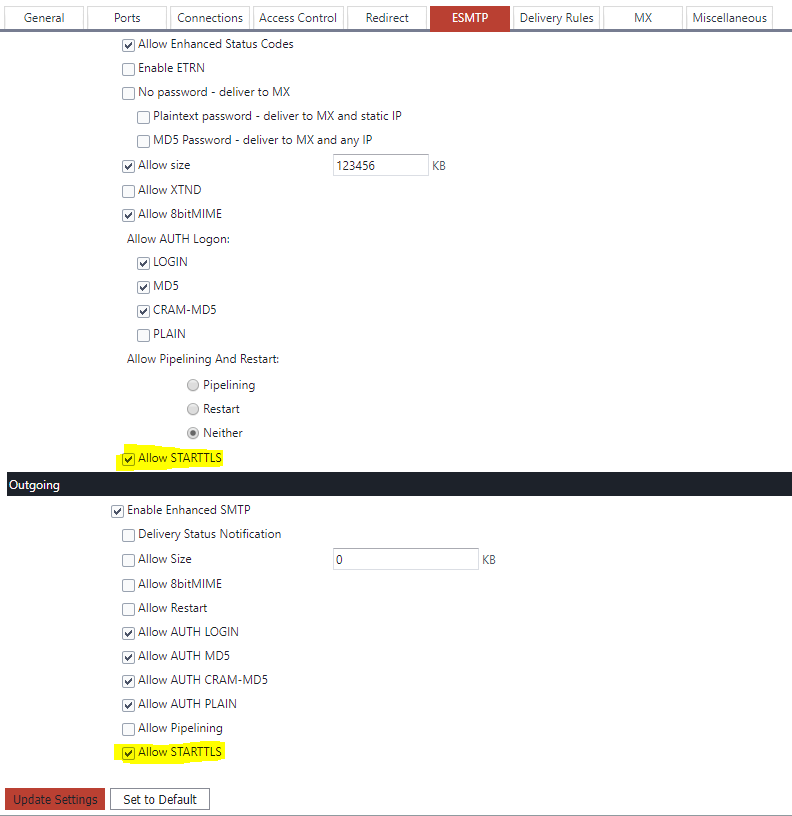
Step 7: enable STARTTLS for incoming and outgoing email
To allow the transmission of secure emails via SMTP both incoming and outgoing, you should enable the “STARTTLS” feature in GMS.
You can do this from the System Administration->Performance->ESMTP page – check “enable STARTTLS” for both Incoming and Outgoing sections:
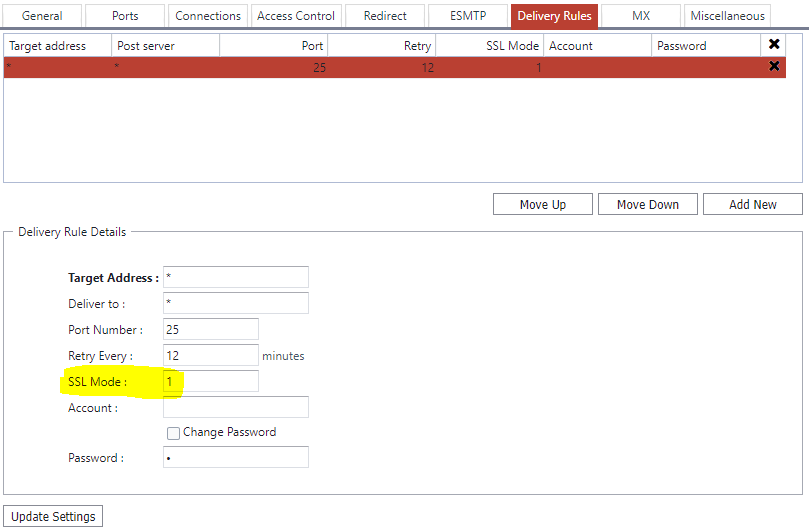
Next, go to the System Administration->Performance->Delivery rules page, and modify your delivery rules to support transmission via STARTTLS where supported. Select each of your delivery rules in turn, and in the edit dialogue underneath, set the SSL mode to “1” then press update settings.
This will cause your outgoing emails to use STARTTLS and be sent securely, if this feature is supported on the receiving email system.
Step 8: test STARTTLS in your POP, IMAP and SMTP services.
Next you need to test that clients using POP, IMAP and SMTP are able to make secure connections. The simplest method to do this is to configure your email client to use “STARTTLS” for incoming and outgoing emails in the server settings menu.
Alternatively, use a tool from a company called “Digicert”. Digicert testing tool.
Step 9: Move to a validated secure certificate
Now that you have installed, configured and tested SSL, you should switch to a real secure certificate – this will help to prevent any SSL security warnings in clients and browsers. There is an article noting how to do this available here – How to upgrade to a certified certificate
If you haven’t already, you should also open any ports in your firewall to permit traffic to reach your GMS server.